At times I wonder what I could do if I ever relaxed and gave myself time. I always judge my work with a very critical eye. How much better could it be if I was not working under a self imposed deadline? The line is starting to blur between quality and speed of build. I think I am getting comfortable under pressure and creativity is thriving where it did not before. I was asked if it would be ready in time for it's trial by fire at Tybee Island. The thought of not finishing on time never crossed my mind.
Another challenge is to make the inserts strong, but also sealed to prevent water intrusion. The mount consists of a 1 1/2" stud mount Ram Base (Ran 202-AU), Ram 14" Arm (RAP-CP-201-14U) and a GoPro 1" Ball adapter (RAP-B-202U-GOP1). The threaded insert was a 1/4"-20 x 5/8" deep.
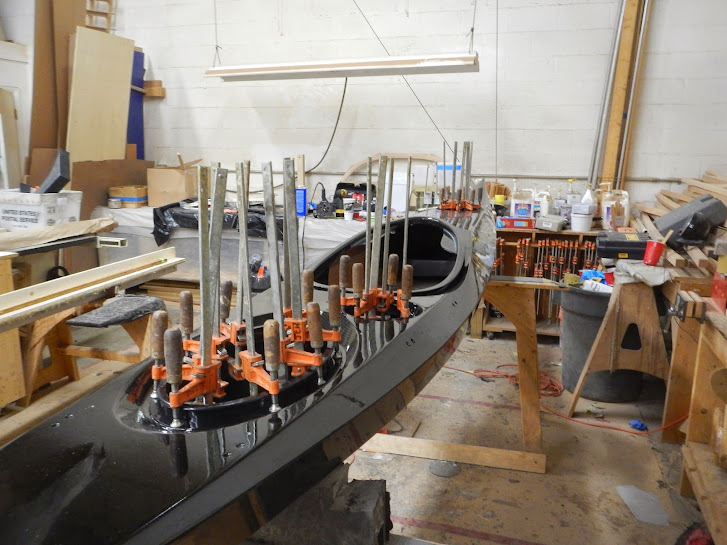
Backing plates were made to stiffen the deck. They were also necessary to create the depth for the insert and have it flush with the surface on top. The issue, is that epoxy and machined components do not mix. To keep the epoxy from wicking into the threads, I applied a liberal amount of wax to the threads of a screw, before installing the inserts. Once installed, the screw was threaded in until it protruded out the bottom by at least one thread. The wax would prevent the epoxy from sticking. The backing plates were bedded into thickened epoxy. A small mound was also applied to the ends of the screws as well as a layer of fiberglass cloth to seal up the bottom of the mounts. Once cured, the screws were removed and the mounts complete. A disc of 1/8" rubber will keep the ball mount from unintentionally un-screwing. Four were made. Two forward and two aft should make for some interesting angles for footage.


Camera Mounts
I've got a GoPro and am very leery of suction cup mounts. I've often said that kayaking in rough stuff is a contact sport. It is fun to catch the action and document it. A camera mount that fails, becomes a huge distraction when your $400 camera is beating against the side of the boat. The design challenge was to construct a built in mount that is strong enough to survive a tumble in the surf zone. It must be flexible for multiple camera angles and solid so camera shake is not an issue. After looking at a lot of options I settled on Ram Mount components and built in stainless screw inserts.
Backing plates were made to stiffen the deck. They were also necessary to create the depth for the insert and have it flush with the surface on top. The issue, is that epoxy and machined components do not mix. To keep the epoxy from wicking into the threads, I applied a liberal amount of wax to the threads of a screw, before installing the inserts. Once installed, the screw was threaded in until it protruded out the bottom by at least one thread. The wax would prevent the epoxy from sticking. The backing plates were bedded into thickened epoxy. A small mound was also applied to the ends of the screws as well as a layer of fiberglass cloth to seal up the bottom of the mounts. Once cured, the screws were removed and the mounts complete. A disc of 1/8" rubber will keep the ball mount from unintentionally un-screwing. Four were made. Two forward and two aft should make for some interesting angles for footage.
The Skeg
There is a lot of debate in kayaking circles about the need for skegs. It used to be considered a design flaw if a boat needed one to balance the handling. This has been proven to be an elitist view point held by purist with an unrealistic view of paddling. The truth of the matter is, a retractable skeg is a tool for the paddler. There when you need it, gone when you don't. Having one makes a boat more versatile. You can have a responsive, easy to turn boat and a boat that is happy in a stiff cross breeze. I personally don't use one much, but when the situation arises, it is a welcome feature to limit corrective strokes when the conditions warrant.
As I often do, I deviated from the stock plans a bit. The skeg box is stock, the control was molded from carbon fiber. I also wrapped the skeg in Carbon for good measure. Normally the box would have a layer of glass prior to installing and then reinforced with fiberglass tape. The box was installed and then fiberglassed in place. This combined a couple of steps into one to save time.
The skeg control was far simpler than it seemed at first. A plug and press was made and waxed to allow for easy release of the part. Layers of Carbon were laid over the plug and the "press" applied. Once cured, the part was released, cleaned and machined to final shape.
The blade got the treatment as well. It was wrapped and pressed in what I call the "poor mans vacuum press" It does the same job, no special equipment required. Peel Ply and waxed foam leave a nice finish that is ready for clear coating when done.
The Day Hatch revisited
In order to make the day hatch a separate compartment, another bulkhead would have to be fabricated. The construction was simple, fitting it would prove to be a challenge.
The construction was nothing more than a L-shaped plug to mold the laminate. I did add a layer of 1708 between layers of carbon for a strong, light weight bulkhead. Shaping was accomplished by the slow process of fit-trim-fit and repeat as necessary method. After several trial fits, I was satisfied that it would fit once the two halves were joined. The bulkhead was attached to the deck as these joints would be the hardest to reach. I take pride in nice fillet work no matter if it is visible or not.
Then two became one...
The rest of the construction was pretty much normal. The exterior fiberglass was applied to the hull. A second layer on the bottom will provide extra impact resistance in the event of the inevitable impact with submerged objects. Three coats of graphite/epoxy mix will also help limit damage.
Next the hull and deck could be joined. A layer of fiberglass is applied to the deck and fill coats of epoxy round out the major construction. The fittings were dressed, coaming installed and a preliminary round of sanding.
The coaming and hip plates received the Carbon treatment. The same technique was used as on the recesses. Once wrapped and cleaned up, the results were worth the extra effort. the plan was coming together and I couldn't wait to get the finish on it.
The final details were left to fore and aft bulkhead installation, end pours and final sanding. Time was becoming the issue, I was down to a week before heading south for Tybee Island. All the little things can really eat up time, especially if it involves epoxy and it's curing cycle. I needed to be careful not to "paint myself into a corner". Four Coats of varnish were applied over a two day period and hatch rims installed.
All that was left was rigging and since it had already been planned, it was just a matter of installing it. The seat had been carved prior, while waiting for epoxy to cure. The "office" as I called it, was fitted out. It was a special feeling sitting in the boat for the first time. Knee braces were shaped and installed with the foot braces and seat. The skeg needed some fine tuning for smooth operation. Once done, I had a day to sit back and enjoy the fruits of my labor. Truthfully, the varnish needed the day to harden a little more before strapping it to the top of my truck.
Now, some might say I am a little crazy to take a new boat and throw it into the fray on the first outing. I have a lot of seat time in this design, but it was a loose fitting demo boat. This one was fit for me. Sitting in it feels tight but completely natural. Getting acquainted in the surf zone was eye opening, The tight fit amplified every input. It was far more responsive as a result. Once I had learned it's tendencies, the fun began. It wants to surf! Run after run, I learned that it required less muscle and more finesse. I couldn't be happier with the results. It got a little beat up, but I look at the scratches as character.
The interesting part is, I had more comments about this boat than any other, It confuses people. They see it and think it is fiberglass. It is sheathed in fiberglass, but they are confused when they see wood in the cockpit. When the sun hits the surface, you can see the wood grain in the black color. Another benefit of the color, it highlights the lines. There is a lot going on with this boat and it is a lot to take in at first glance. I like to see people discover features as they look at the boat. It has certainly raised some eyebrows which is almost as satisfying as paddling it.
awesome!!!
ReplyDeleteHi Joey,
ReplyDeletethis is a very interesting build. What did the final weight end up as?
cheers, Andrew
Hey Andrew, Did not get a final weight on it. Best guess via the calibrated arm, would be around 41-43 lbs. My friends with Brit boats have commented how light it is.
ReplyDeleteHey Andrew, Did not get a final weight on it. Best guess via the calibrated arm, would be around 41-43 lbs. My friends with Brit boats have commented how light it is.
ReplyDelete