Saying the past year was busy would be a gross understatement. After all that was accomplished, I had one more project that I wanted to get out of my system. The concept was to build something visually different. Structurally bullet-proof and highly functional. My criteria was simple. It had to be super tough, at home in rough water and be a complete departure from everything else I had built before.
The choice was a toss up between the Petrel SG or Petrel Play. The SG was a more traditional sea kayak that was designed to perform in rough water with a grace that has no equal. The Play is very different. Shorter and visually more "industrial" in it's appearance, is at home in quiet back waters. Where it excels, is in chaos. It turns quickly, with light input, and surfs like a dream. After careful consideration, It was the Play that won out.
Since the decision was made, the build was mapped out to stuff all my requirements into a short time period. I had three and a half weeks to complete the build, before I would put it to the test in Tybee Island Ga. Luckily my timing was perfect and a kit was being cut in the next few days. The build criteria was a long list, but not insurmountable.
Exterior panels to be stained black
Cockpit interior reinforced with 1708 Biax S2 glass
Exterior bottom to get double layer fiberglass
Graphite bottom for ultimate toughness
Retractable Skeg
Recessed Deck Fittings
Day Hatch
Integral Camera mounts
Carbon accents
 The panels were laid out with the exterior facing up. Normal preparation of cleaning and sanding was done prior to color application. The stain was applied with a rag. An important tip is to double glove, in case of a glove failure. This stain is very tough to get off of your skin. By having a sacrificial glove, the chance of a leak is lessened. You are less likely to look like you robbed a bank and the dye pack exploded! After the stain was finished and dry, a seal coat of epoxy was applied to lock the color in, Even dry, the pigment of the stain will come off when handled.


I won't go into too much detail on this. It has been covered many times in countless build blogs before. Instead I will concentrate on the highlights and different techniques that were utilized.
The hull panels came together quickly. The precision of the parts is incredible. I've been building for fourteen years and this kit is a testament to the advances in programming and skill level of the designer. The machine and personnel operating it have also made huge leaps, which creates a level of exact fit that will satisfy even the most demanding builder. I put myself in that category.
 Normally fillets would be made with a mix of epoxy and wood flour. A relatively new product called Gluzilla is another alternative. It is a translucent white in color, so it is not for every project. Since strength was put above appearance, the ease of use made it the perfect product for the job. The Petrel and Play have a multi-faceted hull. There is more filleting to do that your average build. Being able to dispense it with a caulking gun, speeds up the process while cutting down on waste.

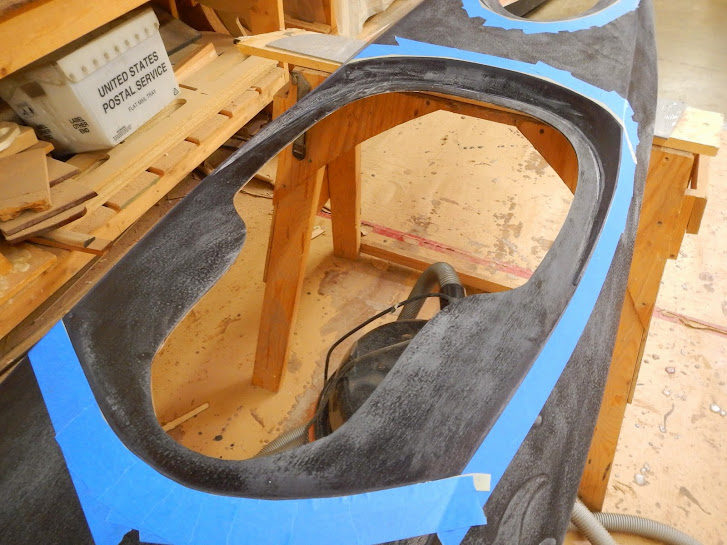
 The cockpit area is the highest stress area of the boat, especially when it is parked on a structure with the paddler seated. Since I will use this boat in a variety of waters, being prepared for the worst, is good practice. I've paddled in some pretty harsh environments, so the extra reinforcement is just for insurance. A layer of 1708 S2 glass was added to the interior cockpit area. The bulkheads create point loads in the structure and can be a point of failure when bouncing off of immovable submerged objects. To combat this, the extra cloth extends past the bulkheads. What makes this cloth unique is the orientation of the weave. The strands are oriented on a 45 degree angle rather than the traditional 90 degree. Having it on the interior stiffens and strengthened the bottom by orienting it on the "in tension" side of the laminate. Imagine parking the boat on a submerged object. The pressure is from the outside pushing in on the hull. The glass layer on the inside will be stretched and is stronger than the compressed side. When it is all said and done, the bottom will be strong. The stock layer of fiberglass was installed as usual. Doing all of this at one time, creates the strongest layup possible. It also allowed for me to fillet and glass the boat in one evening building session. The penalty is some added weight. I'll take it in exchange for the toughness gained.


 The recesses would all get the treatment. Since they are all relatively complex shapes, the cloth will require encouragement to stay put. I used a coating of epoxy with fast hardener as a tack coat for the cloth. While the coat is curing, it gets very sticky and does a great job of coaxing the cloth to conform. Once in place, the cloth was saturated with epoxy and set aside to cure, An important note. Trim off the excess with a new wallpaper snap knife, while the epoxy is green. Waiting until it is cured will only make the job difficult at best.


 Four layers of Carbon Cloth were applied. The strand orientation was turned 45 degrees on each layer. Doing this spreads structural loads throughout the layup. This may seem obsessive, but the hatch is in an area that gets a lot of pressure during rescues. Once the layers were applied, a ring is forced over the layup which pulls the fabric tight to avoid any possibility of voids.


The choice was a toss up between the Petrel SG or Petrel Play. The SG was a more traditional sea kayak that was designed to perform in rough water with a grace that has no equal. The Play is very different. Shorter and visually more "industrial" in it's appearance, is at home in quiet back waters. Where it excels, is in chaos. It turns quickly, with light input, and surfs like a dream. After careful consideration, It was the Play that won out.
Since the decision was made, the build was mapped out to stuff all my requirements into a short time period. I had three and a half weeks to complete the build, before I would put it to the test in Tybee Island Ga. Luckily my timing was perfect and a kit was being cut in the next few days. The build criteria was a long list, but not insurmountable.
Exterior panels to be stained black
Cockpit interior reinforced with 1708 Biax S2 glass
Exterior bottom to get double layer fiberglass
Graphite bottom for ultimate toughness
Retractable Skeg
Recessed Deck Fittings
Day Hatch
Integral Camera mounts
Carbon accents
The Staining Process
Why stain? Why black? I wanted a boat that was visually shocking. I've built pretty boats, this time was about function above form. The "Anti Pretty" boat is what I called it. The purpose behind stain versus paint is simple. The boat can be scratched and dinged, the color is underneath will remain un-touched. I will be rough on this boat as well as teaching with it.
The panels were laid out with the exterior facing up. Normal preparation of cleaning and sanding was done prior to color application. The stain was applied with a rag. An important tip is to double glove, in case of a glove failure. This stain is very tough to get off of your skin. By having a sacrificial glove, the chance of a leak is lessened. You are less likely to look like you robbed a bank and the dye pack exploded! After the stain was finished and dry, a seal coat of epoxy was applied to lock the color in, Even dry, the pigment of the stain will come off when handled.Panel Assembly
The hull panels came together quickly. The precision of the parts is incredible. I've been building for fourteen years and this kit is a testament to the advances in programming and skill level of the designer. The machine and personnel operating it have also made huge leaps, which creates a level of exact fit that will satisfy even the most demanding builder. I put myself in that category.
Normally fillets would be made with a mix of epoxy and wood flour. A relatively new product called Gluzilla is another alternative. It is a translucent white in color, so it is not for every project. Since strength was put above appearance, the ease of use made it the perfect product for the job. The Petrel and Play have a multi-faceted hull. There is more filleting to do that your average build. Being able to dispense it with a caulking gun, speeds up the process while cutting down on waste.
Another subtle difference was the timing of the fiberglass application and the extra reinforcement of the cockpit area. the interior fiberglass was installed while the fillets were curing. The glass beds into the fillets and unifies the structure. While it is stronger, I hope to never test it to it's limit.
The cockpit area is the highest stress area of the boat, especially when it is parked on a structure with the paddler seated. Since I will use this boat in a variety of waters, being prepared for the worst, is good practice. I've paddled in some pretty harsh environments, so the extra reinforcement is just for insurance. A layer of 1708 S2 glass was added to the interior cockpit area. The bulkheads create point loads in the structure and can be a point of failure when bouncing off of immovable submerged objects. To combat this, the extra cloth extends past the bulkheads. What makes this cloth unique is the orientation of the weave. The strands are oriented on a 45 degree angle rather than the traditional 90 degree. Having it on the interior stiffens and strengthened the bottom by orienting it on the "in tension" side of the laminate. Imagine parking the boat on a submerged object. The pressure is from the outside pushing in on the hull. The glass layer on the inside will be stretched and is stronger than the compressed side. When it is all said and done, the bottom will be strong. The stock layer of fiberglass was installed as usual. Doing all of this at one time, creates the strongest layup possible. It also allowed for me to fillet and glass the boat in one evening building session. The penalty is some added weight. I'll take it in exchange for the toughness gained.Carbon accents
If you know me and the boats I build, you know I love working with Carbon Fiber. I can't help myself! It is important that I mention that this is a purely aesthetic application. It just looks cool, plain and simple.
The recesses would all get the treatment. Since they are all relatively complex shapes, the cloth will require encouragement to stay put. I used a coating of epoxy with fast hardener as a tack coat for the cloth. While the coat is curing, it gets very sticky and does a great job of coaxing the cloth to conform. Once in place, the cloth was saturated with epoxy and set aside to cure, An important note. Trim off the excess with a new wallpaper snap knife, while the epoxy is green. Waiting until it is cured will only make the job difficult at best. The Day Hatch
It is important to note, this is a modification to the original design. The space for it was tight and there was no way to construct one to fit with wood. It simply would not make the bends required to pull this off. A plug would have to be made in order to make recess. Having fairly limited choices and time, foam was the obvious choice for the male form. The plug was quickly constructed and waxed for "easy" removal.
Four layers of Carbon Cloth were applied. The strand orientation was turned 45 degrees on each layer. Doing this spreads structural loads throughout the layup. This may seem obsessive, but the hatch is in an area that gets a lot of pressure during rescues. Once the layers were applied, a ring is forced over the layup which pulls the fabric tight to avoid any possibility of voids.
Installation was straightforward. The hole was cut undersized to allow the fit to be tight. Sandpaper adhered to the recess, made it possible to fine tune the hole to the exact shape of the recess. The fit was good, so permanent installation was nothing more that filleting the recess in from underneath. Fiberglass from the top would finish locking it in place.
The most difficult part of the install was centering the hole for the hatch rim. I had to go back to my high school geometry to come up with a solution. So when your kid says, "I'll never use this in real life"....
Deck rigging
Another part of the criteria for this build is recessed deck fittings called "Maroske fittings". What sets these apart from the standard fittings, is that there are no fasteners to fail and are an integral part of the hull. Nothing to leak and no maintenance required. The down side, they can be time consuming to build. I've done this a few times and have got it down to a science.
It does take careful planning to map these out. I use tape to lay the rigging schematic out before drilling any holes. Relying on my experience with different boats, I can tailor the rigging to my desires, Again, function is the most important aspect of the design.
Once satisfied with the design and functionality of the rigging, the construction could start. I use a jig to drill the holes. The jig provides uniform spacing and lessens the chance for mistakes.
The tubing and mandrel assembly is the most time consuming. Having ADHD and strong OCD tendencies, the repetition of this step makes it almost torture for me! The mandrels consist of polyethylene tubing and a section of rope. The 3/16" cord keeps the tubing from collapsing when bent. The cord is threaded into the tubing and the assembly is waxed to keep the epoxy from adhering. Fiberglass sleeve is installed and stretched tightly over the mandrel. Tape is used to keep it tight and keeps the loose threads in check.
The assemblies are installed into the holes drilled previously. Careful attention is necessary to make sure the loops are uniform. Epoxy is applied to saturate the fiberglass sleeve. Thickened epoxy is packed under the loops and a final layer of bias cut 4oz cloth is applied to further reinforce the fittings.
When the epoxy has cured, the tubes can be removed. The cord comes out first, then the tubing. a generous amount of force is required to stretch the tubing and release it. Once removed, the excess sleeve can be removed and the holes dressed to remove any sharp edges.
I really wanted to make this an all inclusive post, but there is too much material for just one. So, stay tuned for the second part of this build. It was fast and furious, but the payoff was one of the coolest boats I've built to date.
Joey - your detailed description and illustration of the maroske fittings is fabulous!
ReplyDeleteJoey, thanks for your extremely detailed explanation of both the Maroske fittings and the day hatch. Could you please indicate the size and brand of the day hatch that you used? Thanks a lot! - Hugo Varotto
ReplyDeleteHi Hugo, sorry for the slow response. It is a Sealect 6 1/2" Performance series Hatch cover and rim. I have been super happy with the Sealect Performance series and will be using them on my production boats.
DeleteThanks for the response! Cheers, Hugo
ReplyDeleteWow, this is incredible!www.almarinesurveyors.com
ReplyDelete